Producing Carton Labels for POE Orders
- Once POE orders have been Scheduled in NetSuite by Customer Service, the Division will request that Order Management generate carton labels to be sent to the factory. The division will notify Order Management of the required labels by email to the Direct Ship inbox.
- Order Management will follow the process for Bulk Fulfilling orders in NetSuite that can be found here.
- POE orders do deviate from the standard Bulk Fulfillment process in the following ways:
- 1 batch can be created for each PO, instead of the standard 1 batch per SO standard.
- The LP Creation Logic for POE orders is Unpalletized, Full Cartons Only and the Pallet field is left blank.
- POE orders do deviate from the standard Bulk Fulfillment process in the following ways:
- Once the Bulk Fulfillment batches have been processed, the carton labels are saved in the Direct Ship SharePoint folder for TJX Customers and emailed to the Division.
Routing POE Orders in the NRS Portal
Order Management will receive an automated email daily from Tiffany that contains the Galaxy container spreadsheet. Order Management will also receive a Packing List for a container that needs routing. POE orders cannot be routed until orders have been scheduled by Customer Service and the Packing List for the Container has been received.
- On the Packing List (and in the email containing the Packing List), you will find the container number. Search for this number on the Galaxy spreadsheet and highlight it in yellow. Find all other containers needed and highlight them in yellow.

- After you have all of your documents ready, you can log onto the NRS portal to enter the container. https://app.nationalretailsystems.com/i-track/login.html
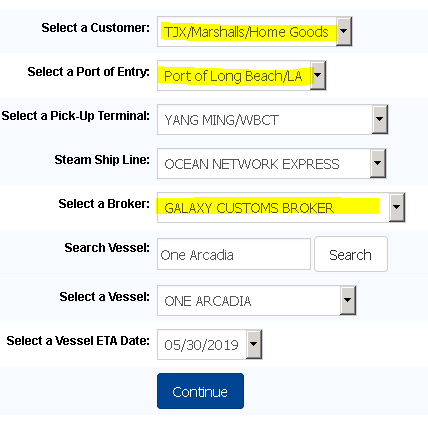
- Using the spreadsheet information, fill in the below. Once completed click Continue.
- Pick-Up Terminal: Cargo Location (on spreadsheet)
- Steam Ship Line: Carrier (on spreadsheet)
- Broker: ALWAYS is Galaxy Customs Broker
- Vessel: Vessel (on spreadsheet)
- Vessel ETA Date: ETA Final Port (on spreadsheet)

- Tips:
- The highlighted selections will always be the same.
- West Basin Container Terminal is “Yang Ming/WBCT”
- Type in the vessel name and click “search” – this will populate the “select a vessel” drop down menu.
- If there is no Cargo Location listed on the Galaxy spreadsheet, use Pacific Container Term as the placeholder.
- Note: If this is used, Order Management will have to update this in NRS once the Cargo Location is available on the Galaxy spreadsheet.
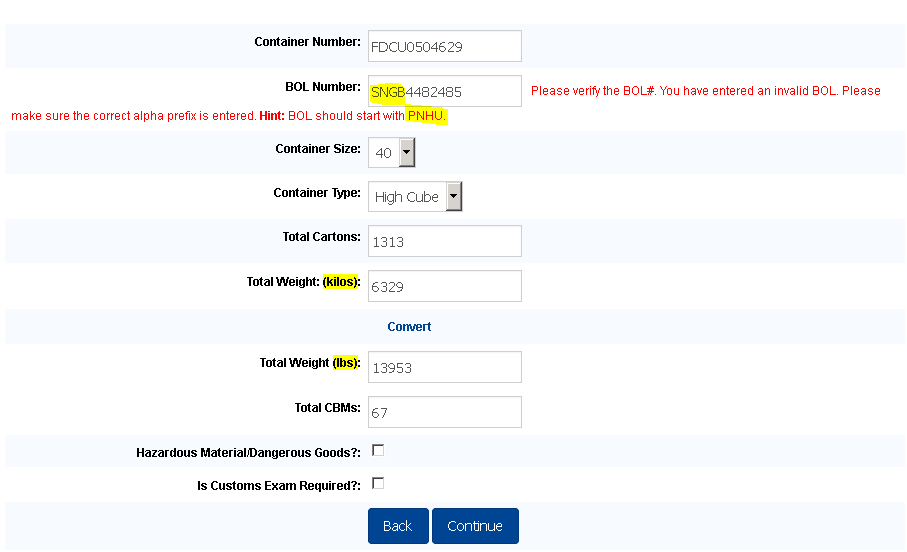
- Using the spreadsheet and Packing List, fill in the below. Once completed click Continue.
- Container Number: Container# (on spreadsheet) without dash
- BOL Number: MBOL (on spreadsheet)
- Container Size: ALWAYS is 40
- Container type: ALWAYS is High Cube
- Total Cartons: total piece count (on packing list)
- Total Weight (kgs): total weight in kgs (on packing list)
- Total CBMs: volume/CBMs (on packing list)
- Tips
- You will receive an error message after clicking “Continue” saying that the BOL is invalid. Enter the 4 letters the NRS system suggests using for the BOL.

-
- Populate “Total Weight (kgs)” and it will automatically fill in “Total Weight (lbs.)”.
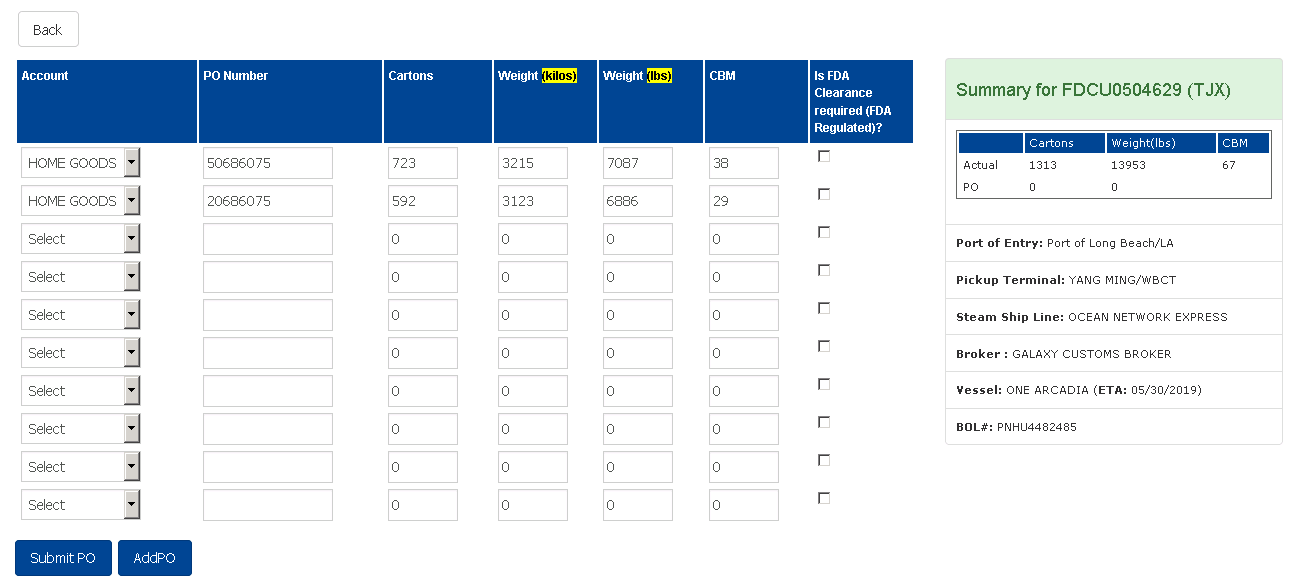
- Using the packing list, fill in the information on the next page for each PO on the container.
- Account: Select the Customer Name from the drop-down box.
- PO Number: PO number (without dash)
- Cartons: Carton count for each PO
- Weight (kgs): Weight in kgs for each PO. Round to the nearest number
- Weight (kilos): this will automatically populate.
- CBMs: Volume/CBM for each PO. You will need to round to 2 decimal places.
- Tips
- Make sure the weight (lbs.) automatically populates correctly. Sometimes it misses the last digit, so you can delete the weight (kgs) and rekey to make sure it populates correctly and fully.

- Review the Summary information on the right side of the screen to ensure that the Actual and PO information matches. Click Submit PO.
- Commonly there will be small discrepancies between the weight and the CBM due to rounding. Adjust as necessary to ensure the values in the Summary section match. You will not be able to Submit PO if they do not match.
- On the next page, scroll to the bottom and click the box next to “I agree to these terms” and click Submit.

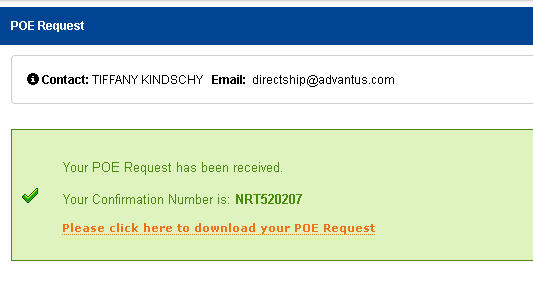
- You will receive a Confirmation Number that will need to be entered into the OUT Locations Spreadsheet. You will also click on the “Please click here to download your POE Request” link.
- This will take you to a PDF confirmation page that needs to be saved in the NRS folder on the Direct Ship SharePoint, using the following naming convention: 3 Letter Customer Abbreviation – POs – (Container Number) – Confirmation Number.

- Navigate to the OUT Location Orders Spreadsheet and add the Confirmation Number for the routed container in the Routing Confirmation column and enter Submitted into the Routing Status column.

